Disclosure: This post contains affiliate links and I may earn a small commission if you purchase through these links.
You’ve probably seen a lot of content about vacuum cleaners on the internet. That’s because there are so many different types of vacuum cleaners. Each one has its own unique handle, and I’m going to show you how to take apart a shark rotator vacuum handle.
Are you terrified yet? Don’t be! It’s not as scary as it sounds. All it requires is a screwdriver and laser focus on the mechanics of the handle.
The handle of a shark rotator vacuum is a fragile piece of equipment. It is bound by at least 7 screws, so it is made up of various small parts that are easy to break.
But that doesn’t necessarily mean dismantling it is difficult! I’m going to show you how to take the handle apart in a few easy steps.
This is what a shark rotator vacuum handle looks like: (Do you notice how many screws there are?)
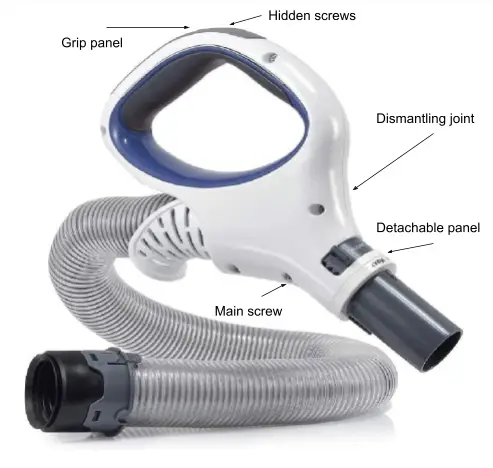
Figure 1: Shark Rotator Vacuum Handle with Labelled Parts for Dismantling Process
Conquering the shark (rotator vacuum handle)
- Disconnect the vacuum cleaner from the main power supply. Then, detach the vacuum hose ONLY from the vacuum bin. Take a look at this article if you need help locating or detaching your vacuum hose.
- Once you’ve finished doing that, you should be left with just the vacuum handle and the hose. This should look like the object in Figure 1. At this stage, don’t try to pull out the rest of the hose or detach it from the handle.
- Begin the dismantling process with the “main screw.” This is because the two screws on the belly or underside of the handle hold its two side panels together. So, before opening the sides, we must unscrew the middle screw. Keep in mind that this will differ depending on the vacuum model you’re using.
- The entire vacuum handle may be different depending on the model, but the grip panel is the same in most models. Use a soft tool like a nail file to pry open the grip panel without tearing the foam coating. Here, you will find two hidden screws. I almost missed these and broke my vacuum handle! So do unscrew them, please.
- Now that you’re done with the main group of screws, you should remove all the other screws. Those are more obvious and easy to work with. Just remember to keep the screws in a safe place for replacement later.
- You’ve removed all the screws. The two side panels should now feel loose. We’re not done yet because the tricky part is just beginning! Using a flat screwdriver, pry open what is labeled as the “detachable panel.” DO NOT use a lot of force.
- Taking apart the handle should now follow a natural progression because its parts will have come loose. I would recommend sorting the parts into categories as you take apart the handle.
- You’re done! Now you can remove the hose if you want to clean it.
Congratulations, you warrior! You conquered the shark.
Further Reading