Disclosure: This post contains affiliate links and I may earn a small commission if you purchase through these links.
Your freezer has to put up with a lot! It has to maintain its chilly temperatures for everything that you cram into it. Moreover, it has to endure countless opening and closing of its door. All these factors can affect its ability to do its job.
The best way to keep your freezer in great shape is to defrost and clean it on a regular basis. It may sound like a daunting task, but defrosting is easy and quick.
Throughout the years, I’ve gathered advice from friends and experts on the best cleaning products and techniques to use in your home. Today, we’re focusing on how to defrost a freezer.
In this article, I’ll show you a few simple tips and tricks I use when cleaning out my freezer at home. Let’s roll up our sleeves and dive in!
Defrosting the Freezer: An Easy Step-by-Step Guide
Defrosting the freezer is a simple 4-step process. The most challenging part is mopping up all the water from the melted ice. You’ll also need to find a proper place to store your frozen food until it’s ready to go back in the freezer.
If you’ve never defrosted your freezer before, have no fear! Use my easy, no-fuss 4-step plan, and you’ll have a clean, ice-free unit in no time.
Step 1: Unplug the Freezer
Unplug the unit so the ice can begin to melt. If you prefer, you can keep it plugged in and turn the thermostat knob to ‘0’ or ‘Stop.’
Are you going to defrost a portable chest freezer? In that case, move it outside or to your garage to make cleaning up quick and easy.
Step 2: Remove the Food
Place the frozen food in coolers filled with ice to prevent thawing. You can also use any large container or even freezer bags to keep them chilled for as long as possible.
Step 3: Protect the Floor
Lay some plastic liners or towels on the floor in front of the freezer. Beach towels work even better. Their size and thickness allow them to absorb a lot of water.
Another trick is to place rags and towels on the lower shelves of the unit. They’ll help absorb most of the moisture before it reaches the floor.
Step 4: Let the Ice Melt
The easiest way to defrost a freezer is to leave the door open and let the ice melt. This simple technique can take anywhere from two to three hours. For full-sized freezers, some people wait a full 24 hours to make sure it’s completely defrosted.
One time I was in a hurry, so I reached out to a friend who offers maintenance solutions for freezers and fridges. He gave some great tips on what I can do to speed up the defrosting process.
- Place a fan in front of the open freezer door to circulate the air inside.
- Lay folded towels in the freezer with pots filled with steaming hot water on top of them.
- Move a hairdryer around in front of the open freezer door.
- Spread a layer of salt over the ice.
- Never use a knife, ice pick, or any other sharp object to remove the ice.
- If the ice is relatively thin, pour rubbing alcohol on a soft cloth and wipe it down.
Cleaning the Freezer
Once all the ice has melted, and you’ve moped all the water, it’s time to start cleaning. I personally prefer using natural products. You can also find non-toxic cleaning products that have been deemed safe for household use.
These are usually made with eco-friendly and organic ingredients. They’re safer to use, unlike some commercial cleansers that are loaded with volatile organic compounds (VOCs) known to cause serious health problems.
The two most common natural cleaners are white vinegar and baking soda. Both do a great job of disinfecting surfaces, as well as neutralizing odors, thanks to their antibacterial and antimicrobial properties.
Vinegar is highly acidic. It’s this acidity that works to dissolve grime and grease. To use, fill a deep bowl with two parts hot water and one part vinegar.
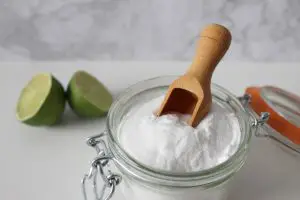
With baking soda, use one tablespoon with four cups of hot water. I like the abrasiveness of baking soda. It helps remove difficult stains while polishing the inside of the freezer.
Using a sponge or soft cloth, wipe down the inside of the freezer all around. Remember to wipe the door and outside of the freezer as well.
Another area that many of us forget is the seals on the freezer door. They may seem dormant, but they play a significant role in keeping the unit working at its best condition.
“How?” you ask. Seals on the freezer door prevent warm air from entering, keeping the temperatures inside the freezer at their optimal range. In turn, your freezer’s energy consumption and your energy bill will go down.
When you’re done, you don’t need to rinse the baking soda or vinegar with clean water. Their smells, especially vinegar, will evaporate soon enough.
If you have shelves or drawers in your freezer, take them out and wash them with warm, soapy water. Rinse and wipe them dry.
A pro-tip: it’s better to wait until the shelves reach room temperature before you remove and wash them, especially if they’re made of glass. The sudden shift from icy cold temperatures to warm water can make them shatter.
Finally, it’s time to dry the inside of the freezer. You can use a soft cloth to wipe it dry, or you can leave the freezer door open for about 5 to 10 minutes. Having a dry interior inhibits frost from building up inside the unit.
Re-frosting the Freezer
One question I get asked a lot is, “How long does it take for a freezer to get cold after defrosting?” There isn’t a hard and fast rule when it comes to restarting your freezer.
The time a freezer takes to reach freezing temperatures depends on its model and size. An average estimate would be between 12 and 24 hours.
Let me tell you a little technique I use. Once I turn the freezer back on, I fill an ice tray with water and place it in the freezer. When the water turns into ice, that’s when I know I can put everything back into the freezer.
This usually takes around 10 or 11 hours. I have to constantly resist the urge to open the freezer for a quick peek. I know that if I do that, I’m just prolonging the process. So, remember to keep the freezer closed for at least the first six hours once you turn it back on.
Restocking the Freezer
You’re almost there! The freezer is returning to its former glory once again, and it’s finally time to put everything back in.
Keep things organized and maintain a system you can easily remember. Having a well-arranged freezer can help prevent frequent ice buildup, which is always a good thing.
Another plus is that you can quickly find what you’re looking for. I put together some tips that may come in handy when you’re refilling the freezer.
Never Freeze Warm Food
If you have anything that’s still warm after cooking or just by sitting on the countertop, put it in the fridge first. Once it’s cooled down a bit, then you can store it in the freezer.
Heat causes condensation. Condensation raises the temperature inside the freezer, which is the exact opposite of what we want.
Keep Food Tightly Covered
Make sure you keep food items tightly covered or place them in airtight containers. This prevents moisture from the food from escaping into the freezer and causing ice to form.
Store Raw Proteins in the Back
Raw proteins should be placed in the coldest part of the freezer, farther at the back. This includes red meats, poultry, seafood, and eggs.
Place Items Close Together
Organize items in the freezer so that everything is well-packed. There should be little space between them to reduce airflow and boost the freezer’s ability to maintain the right temperature.
If you don’t have enough things to put into the freezer, you can place water jugs or ice cube trays. Some people like to ball up newspapers and cram them in to fill up space. The best thing about newspapers is that they’re great at absorbing extra moisture in the freezer.
How to Defrost a Freezer: FAQs You Don’t Want to Miss
The idea of defrosting your freezer seems simple enough. Yet, in reality, it might be a bit of a hassle if you don’t know what to expect.
Read below for some frequently asked questions that can help you out.
How Often Should You Defrost Your Freezer?
In general, you should deice your freezer once a year. Keep a mental note of the time your freezer takes to build up ice.
How often does it make 1/4-inch layers? If it happens frequently, then you should defrost your freezer every six months at least.
Check your manufacturer’s manual. It’ll provide special instructions on the best time and method for defrosting your freezer.
Why Is Defrosting the Freezer Important?
Regularly deicing and cleaning the freezer is vital for several reasons. I’ve listed a few of them below.
Maintain the Unit’s Efficiency
Each time the freezer door opens, warm air from the outside seeps in. The warm air causes moisture build-up, which turns into ice and frost. This icy layer of frost covers up the temperature sensor and inner air vents.
When these parts are covered up in ice, they can’t do their job effectively. So, the compressors, coils, fans, and all the other working parts work double-time. They do this to try and keep the unit and everything in it at freezing temperatures.
Reduce Energy Consumption
When the inside of the freezer is completely covered in thick layers of ice, it can no longer maintain the required temperatures. As a result, the unit has to work harder. The result is large amounts of wasted energy, which isn’t good for the environment or your electricity bill.
By working harder, the unit inadvertently creates more icy build-up. This wastes even more energy, and the cycle continues.
Research shows that even 1/4 inches of ice buildup in the freezer can increase energy consumption by up to 10%. That’s tremendous!
What’s worse is that it may even lead to the freezer breaking down altogether. You shouldn’t be spending your hard-earned money on high electricity bills or getting new freezers.
By maintaining a clean, ice-free freezer, you can preserve the integrity of your unit for years to come.
Keep Food Fresh and Clean
Keeping your food storage area properly sanitized will preserve the taste, texture, and quality of your food. Food-borne illnesses are a direct result of contaminated environments where mold and mildew easily grow.
What Do You Do with Frozen Food During Defrosting?
The best way to store frozen food is in coolers. On several occasions, I’ve put my frozen food in portable freezers, refrigerators, and even buckets. One option is to ask a neighbor to help you out. If they have space in their freezer, they can store some of the food for you.
If you’re deicing your freezer during the winter, especially if the temperatures outside are freezing cold, you can leave the food on the balcony or the porch. Add plenty of ice to keep them from thawing. As long as you keep them out of the sun and away from any warm areas in your home, they’ll be able to stay frozen for longer.
Another easy option: just leave them on the window ledge. Keep them wrapped in newspapers or blankets to maintain their chilled temperatures. Then, lay them on folded towels.
What Foods Can’t Be Refrozen?
What if some of the food thawed before you had a chance to get them back into the freezer?
For health reasons, there are certain food products you can’t refreeze once they’ve partially or fully thawed. You can either cook them within the next 24 hours or throw them out.
The problem with refreezing is on a molecular level. Freezing something that has already thawed breaks down its cell walls. This compromises the integrity, taste, and nutritional value of the food product.
Another reason why refreezing is bad for some foods is bacteria. Certain foods start to grow harmful bacteria once they start melting. If you re-freeze them, you’re locking in the bacteria along with the food.
This is a big health concern. So much so that there are laws and regulations that govern the way restaurants and supermarkets store their frozen foods. It’s only right that we follow the same rules in our homes.
Here’s a list of some of the foods you should never re-freeze.
- Raw proteins, such as red meat, poultry, and seafood
- Cooked proteins
- Combination meals, such as pasta, stews, casseroles
- Smoothies and fruit juice concentrates
- Ice cream
Can You Defrost a Freezer without Switching It Off?
No, you can’t. If you don’t turn off the freezer, the ice will not melt. You’ll need to hack off the ice, which can cause damage to the unit. Also, you can injure yourself.
Don’t forget that you’ll keep the door open as you’re attempting to hack off the ice. This will result in extreme energy consumption and even the failure of the entire unit.
Can Freezers Defrost Themselves?
Recently, manufacturers have been designing frost-free units. They’re known as ‘self-defrosting’ because they do all the hard work for you. You may only need to manually defrost the freezer if you’re moving or upgrading your freezer.
It’s important to mention that chest freezers aren’t frost-free. You have to defrost them manually using the steps I mentioned above.
The good news is that many models come with a drainage hose. They minimize the mess by guiding the melted ice water into a bucket or bowl.
How Can I Prevent Ice From Piling Up Too Quickly in the Freezer?
A friend of mine once told me the secret to slowing down the layers of icy build-up in the freezer. Now I’m passing it on to you.
Are you ready? It’s glycerin! Mind-blowing, right?
You can find glycerin at any drug store, but if that’s not an option, vegetable oil works well too.
Soak a paper towel in glycerin or oil. Then, wipe the inside walls of the freezer. You can also line the interior with paper towels to create a formidable barrier.
A Final Note
Knowing how to defrost a freezer the right way is important. Regular deicing ensures you have a hygienic unit you can rely on.
It frees up large chunks of space so you can organize your packages, jars, and bottles. More importantly, you know where they are and can actually find them!
Another great thing about regular defrosting is that it’s cost-effective and helps lower your electricity bills. That’s certainly something to smile about.
Further Reading