Disclosure: This post contains affiliate links and I may earn a small commission if you purchase through these links.
Taking a warm, soapy bath is surely one of the best ways to pamper yourself after a long day at work. But without proper cleaning, a snow-white bathtub will quickly collect sizable spots of horrible yuckiness. Before you know it, the relaxing experience becomes a stressful chore that keeps hanging over your head.
Let’s end this once and for all, shall we? In this article, I’m sharing my full experience on how to clean a dirty tub — be it acrylic, fiberglass, enamel, or ceramic. Let’s get going!
First of All, What Are We Dealing With?
I know that you probably came here expecting to find a step-by-step guide on using a sophisticated list of chemicals. Although I’ll give you that later on, I want to start with something more important.
If you want to deeply clean that yucky soap scum from your tub, you should know how it formed in the first place.
The Scum Cycle
It all starts with the minerals present in water, namely calcium and magnesium.
During a quick shower, these minerals don’t get a chance to settle, which explains why soap scum isn’t that common with shower enclosures. But during a long bath, these minerals react with the soap chemicals, creating a mixture that can bind to the tub surfaces.
But wait a minute; if that soap scum is mainly composed of soap, why does it feel and smell awkward? Well, the reaction sadly picks up your body oils, dead skin cells, hair, dirt, and any other impurities swimming inside the bath.
And because these impurities are mostly organic, they decompose after enough time, emitting sulfur and nitrogen, which are partly responsible for the foul smell.
It Might Be Bad for Your Health
Even after the organic decomposition, the soap scum should have an off-white color. But what if it turns green, blue, or red? That would be a serious red flag.
These new colors result from the growth of mold and algae, with each color representing a different species. These tiny organisms already thrive well in moist environments, but they grow steadier over sticky soap scum.
Are these moldy spots bad for your health? We still need tons of research in that regard, but we already have some alarming doubts. For one, exposing young children to bathroom mold might make them more susceptible to developing asthma, according to the Centers for Disease Control and Prevention (CDC).
Identifying the Material of Your Bathtub

If you squint at the instructions of any heavy-duty cleaner, you’ll find some tiny sentences warning against pouring the product on particular surfaces. These warnings are crucial because if you don’t know your bathtub’s material, you might mess up its color and texture forever.
To avoid this, I’ve prepared a brief rundown of the most common materials, explaining how you can quickly identify them.
Fiberglass and Acrylic Bathtubs
Fiberglass and acrylic bathtubs have been gaining wide popularity because of their affordability and ease of installations. And thanks to their light construction, they don’t need a reinforced floor.
You can easily identify both materials by touch. If you firmly pinch one of their edges with your fingers, it should slightly flex.
As you might already know, these materials are extremely sensitive. Harsh chemicals and rough scouring pads will inevitably scratch their surfaces and scrape their natural color.
Enamel Bathtubs
Enamel tubs feature a cast iron core that’s coated by a layer of powdered glass cooked at extreme temperatures. Unfortunately, that glass coating isn’t scratchproof, which is why you should abstain from using scouring pads and harsh cleaning solutions.
Unless you have a grip stronger than Superman’s, you can never bend these tubs with your fingers. Also, if you hold a magnet close to their surface, the iron core will attract it.
Ceramic Bathtubs
Ceramic bathtubs are made from special clay that hardens up when subjected to high temperatures. They highly resemble their enameled counterparts, except that they lack the iron core — that’s why magnets won’t stick to them.
If you knock on these bathtubs, you should hear a deep, hollow thud rather than a metallic “clink”.
Before We Begin Cleaning, Here’s a Quick Tip for Your Back
In his talk with HuffPost, Dr. Nick Shamie, a professor of orthopedic neurosurgery at UCLA, spoke about some of the most destructive habits that can increase the likelihood of back injuries. Much to my dismay, sitting and bending ranked third!
“The most pressure on your discs comes if you’re seated and lean over to pick something up,” says Shamie. “And it’s particularly hard on the lower back.”
Dr. Mauricio Campos-Benitez, a renowned neurosurgeon, explains, “We tend to fold at the stomach when we bend over, creating a ‘C’ shape. This type of bend puts a lot of pressure on our spines and spinal disks.”
So, what should you do? You have two alternative solutions. First, wrap one of your towels or bath mats into a small roll, and place it right in front of the tub. This way, you can kneel over it for as long as you need without hurting your back or knees.
If your tub is so large that you can’t properly clean it while kneeling, you should try hinging at your hips. To do that, bend your knees and move your hips backward while keeping your back straight. You can place one of your arms over the tub to balance yourself while scrubbing. But whatever you do, never bend your back!
How to Clean a Dirty Fiberglass or Acrylic Tub
The first step-by-step guide will tackle those incredibly common materials — fiberglass and acrylics. As I said earlier, you must go really easy on these bathtubs, or else you’ll damage their finish.
Step 1: Run Your Bath With Piping Hot Water
Although these tubs can’t withstand powerful chemicals, they can hold their ground against piping hot water — that’s their sole job, after all!
The high temperature and the accompanying steam will break down the soap scum spots and kill any organisms hiding inside them. This way, the cleaning process will require less elbow grease, and it won’t be as dangerous for your health.
If time isn’t an issue, keep the hot water standing in your tub until it becomes lukewarm. If you have other chores, five minutes will do.
Step 2: Spray Some Vinegar
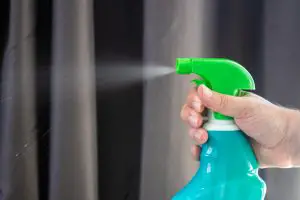
I’m sure you’ve bumped into dozens of cleaning guides suggesting the use of white vinegar. But have you ever wondered why?
White vinegar is mainly composed of acetic acid. Although this acid isn’t as powerful as bleach, it’s still strong enough to dissolve limescale and kill some pathogenic bacteria, in addition to the flu virus. Best of all, it’s 100% environmentally friendly. It doesn’t form any compounds that can harm wildlife, unlike bleach.
To use that ingenious cleaner, simply load it in a spray bottle and spritz it liberally all over your bathtub. If the smell is too strong for you, consider adding a few drops of your favorite essential oils. You can also substitute with some lemon juice.
Whatever you use, let the mixture sit for at least 20 minutes. If you want to guarantee optimum efficiency, apply a second coat from the same mixture after about 10 minutes.
Step 3: Wipe the Stains
Grab a smooth sponge, rinse it with water, and wipe the bathtub. If the stains lift away easily, congrats! If not, stop wiping and proceed to the following step.
Remember, you should never use a sponge with a scouring pad to clean fiberglass or acrylic tubs. If you can’t tell whether the sponge is smooth enough, use it to scrape a small, hidden part in your tub. Then, palpate with your fingers. If you notice any change in the texture compared to the surrounding area, search for a smoother sponge.
Once you think you’ve removed most of the stains, use your showerhead to rinse the tub. If you don’t have a detachable showerhead, a plastic pitcher will do.
Step 4: Dealing With Stubborn Stains (Optional)
If you haven’t cleaned your bathtub in a long time, you might have a hard time removing a couple of stains. You can try pouring additional vinegar coats, but you’ll probably scrub in vain.
Alternatively, you can use the following cleaning mixtures, which are slightly stronger than vinegar.
Baking Soda & Vinegar
Sprinkle some baking soda, and spray a few drops of vinegar on top.
Because baking soda is alkaline, it’ll vigorously react with the acidic vinegar, resulting in a foamy fizz. The tiny energy emitted by this reaction should dissolve the stubborn minerals in about 10 minutes.
Bear in mind the baking soda is mildly abrasive. Joanne, one of my college friends, ended up with a pretty large white patch in her cream fiberglass tub after using baking soda. But to be fair, her tub is about 15 years old! For all we know, this white patch might be its original color!
However, it’s better to err on the side of caution. Do a small test on a hidden part to make sure both color and texture stay the same.
Borax & Lemon Juice
When mixed with water, borax converts into hydrogen peroxide — a potent alkaline whitening agent. I prefer to mix it with lemon juice because, as an acidic solution, it detracts from the abrasive property of borax. And of course, it adds a satisfying, welcoming aroma to your tub.
And as I said earlier, always perform a small patch test before cleaning a large area. You should rinse the mixture after about 10 minutes.
Step 5: Dry Well
Since we’re using mild natural cleaners, we can’t be 100% sure that we removed all soap scum. If you leave any water pooling inside the tub, new scum spots might form, even before you use the tub again.
To avoid this, thoroughly dry the tub with a microfiber cloth or some paper towels. And leave the shower curtain drawn to vent the humid air.
How to Clean a Dirty Enamel Tub
Even though enamel is generally durable, harsh acids and abrasive cleaners might chip parts of the glossy surface, leading to unsightly scuffs. Here’s the most effective cleaning approach that steers clear of any potential damage.
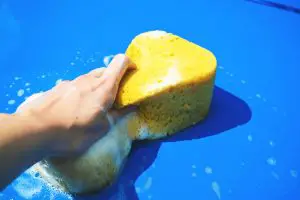
Step 1: Soften the Stains
In a large bowl of hot water, stir two tablespoons of dishwashing soap until you get a thick lather. Soak a large, smooth sponge into that mixture, and use it to scrub the whole tub in overlapping circular movements.
After lathering the whole tub, rinse it with lukewarm water. If you can see any lingering stains, quickly wipe them again with soap before moving on to the next step. Remember, your goal is to reach the cleanest state with the least amount of chemicals.
Step 2: Follow Up With Baking Soda
In a clean bowl, mix one cup of baking soda with a slight amount of warm water to create a creamy paste. After stirring well, paint that paste over the stubborn stains that you couldn’t remove earlier.
After about ten minutes, pick up the mixture with paper towels, and rinse the tub with hot water to remove the remnants.
By now, most of the visible stains will have been removed. Nevertheless, if you slide your fingers over the tub, you might feel some irregularities, indicating the presence of clear soap scum. Don’t fret, though; the final step is ought to clean that.
Step 3: Finish Off With an Acid Mixture
The cream of tartar, aka potassium bitartrate, isn’t only beneficial for baking. Thanks to its moderate acidic properties, it can also help you scrape any lingering stains with minimal effort.
To formulate a usable paste, mix one tablespoon of cream of tartar with a small amount of 3% hydrogen peroxide (you can purchase this at your local pharmacy).
Just like the previous step, you should let the paste sit for 10 minutes before rinsing it with hot water. Keep applying it if the stains persist.
How to Clean a Dirty Ceramic Tub
If you own a white ceramic tub, consider yourself lucky! That bad boy can hold its ground against the harshest chemicals, including the mighty bleach.
Colored tubs won’t necessarily fade, but it’s better to stay away from bleach nonetheless. Here’s the safest and most effective approach to clean these tubs.
Step 1: Start With Soap
Begin by scrubbing with a soft sponge dipped in a solution of warm water and dishwashing soap. Because porcelain can maintain a perfectly smooth surface, most stains will vanish through this simple approach.
Step 2: Get the Bleach
If the soap doesn’t work the first time, save yourself the hassle and go get the bleach.
Since the bleach can harm your skin, you should never mix it in a bowl or pick it up with a sponge. You should mix one part 5% bleach with ten parts water in a large spray bottle.
Afterward, cover the bathtub stains with paper towels, and spritz the bleach mixture on top. This method protects the surface gloss of ceramic, decreasing the likelihood of fading.
Remember, you shouldn’t use bleach unless you have a white bathtub. And even then, it’s always better to check the manufacturer’s instructions to make sure you’re in the clear.
If you own a colored tub, use a paste of baking soda and warm water to remove the stains.
How Often Should You Clean Your Bathtub?
In my opinion, you should clean your tub after each use. I know that you might be gasping in disbelief right now, but hear me out.
If you wipe your tub with nothing but paper towels after each bath, I can guarantee that you’d never have to do a deep clean ever again!
Not only will this save tremendous effort, but it’ll also prolong your tub’s lifespan by abstaining from the use of any chemicals.
But let’s be honest, you’re bound to laze away after a warm, soft bath. If you can’t stick to the clean-it-after-you-use-it rule, you have to do it at least once every two weeks.
Bonus Tip: A Clever Way to Fight Soap Scum
Want to reduce your cleaning time by half? Use car wax! I learned that genius trick from a friend who used to work in a car wash service. Apparently, that wax will adhere to your tub, preventing soap scum from settling on the surface. Best of all, you’ll need to apply it only once per year. How’s that for convenience!
To start, thoroughly dry your tub with paper towels. Then, start applying the wax by using the applicator pad that comes with it. Move the pad in an overlapping circular motion to make sure you cover the whole tub.
There’s an important thing to note here. You shouldn’t wax the base of your tub because this will make it too slippery. Just apply a thin coat over the sides, and maybe over the rims.
After applying the coat, let it sit for ten minutes, and then wipe the surface with a clean microfiber cloth to pick up the excess wax.
That’s All for Today!
That marks the end of my full guide on how to clean a dirty tub. Remember, it’s crucial to understand the limits of your tub’s material. Always start with the weakest cleaning solutions and work your way up to the harsh ones only if need be.
Good luck!
Further Reading